Weekend Warriors

Monday, September 28, 2009

One thing we know how to do here at our house is fully take advantage of a rainy weekend. And for those of you who thought our craft studio was gonna be just another pretty place to sit, I give you felted flower pins!!!! The girls and I trudged into Goodwill in the pouring rain and bought every cute wool sweater (make sure they're 95-100% wool---or they won't felt) we could find, promptly washed them in hot water (which shrinks them and turns them into felt), and commenced the flower 'arranging'. We printed some templates from here and then just added our own personal embellishments.

I made this gargantuan black 'rose' and could barely move my left arm without hitting it---but it's so darn cute and very anthropologie-esk. I made the middle portion of the flower by cutting about a 1/2 inch end of the cuff of the sweater (so that you have a small little circle of fabric) and then make a cut so that it forms a single length of fabric and then roll that little piece 'on' itself and glue as you go. I used the macdaddy of all craft glues: E6000---which will make your room smell like you're making something industrial---but it works like a charm. BTW, that cute shirt that I wore under my black dress to church----Goodwill---$1.50! I know, I know! That's the bonus of 1/2 price Saturday at Goodwill.


Elea (my 7yo) made her own flower and wore it Sunday as well. She was beaming with pride.
And one thing's for sure about making flowers this way; the felt is just dreamy. It's thick and hold's it's shape but is just moldable enough. I used fabric scissors to make my cuts but a rotary cutter would work fine, as long as its very sharp. If you're house is like mine, there's 72 pairs of scissors and only one that really cuts anything.

I cut the templates out first and then pinned them to the felt to make the cuts in the felt. My cutting skills weren't perfect but after you add several layers to the flower, the imperfections seem to disappear.

And after we'd 'felted' till our hearts were content, we switched gears to needle point. For those of you who love numbers, I re-threaded the needles 427 times. Or so.

Our precious little Studio 8 took a beating. There was floss and wool and thread , and chocolate chip cookie crumbs everywhere.

A bright spot in the room--despite the explosion of crafty-wooly goodness-- was the 'heather' in the window sill.

When our little fingers were tired and aching, we switched to reading. May I recommend Glen Beck's new book (which to my delight contains Thomas Paine's Common Sense in the back)? I love the subtitle: The Case Against an Out of Control Government. Amen to that.


Don't worry, there was plenty of football too. Did you happen to see the most awesome play by Brett Favre at the end of the Vikings game? It was the perfect ending to a wonderful, somewhat lazy, very crafty weekend.

Oh and pretty please, will you come visit me tomorrow? I'm traveling to a wonderful friend's blog site to do a guest post and I'd love it if you'd be so kind to say hello to her---she has some delightful ideas for being a gracious hostess----and to say hello to me---'cause I'll be a little nervous--hoping to be a gracious guest!! I'll be at Sandy's from FourReluctantEntertainers, whom I met her in real life last year at Blissdom. She is as beautiful, talented, and friendly in real life as she appears on her blog. You're gonna love her too.

Love to you all and thank you from the bottom of my heart for meeting me here every day. You inspire and encourage me in ways you'll never know. Hugs to you and blessings to your family!

I'm joining Kimba's DIY day so click here for more fabulous projects!

The Making of a Craft Studio

Tuesday, September 22, 2009

It is with great pleasure I give you: Studio 8


She had a sinewy mind, capable of violent enthusiasms and possessed a driving energy to make and do. Sometimes, it seemed as if the wrong soul had been placed inside that slight body, for she pushed herself to her limits and beyond, and was often ill as a result. There was something in her that could not, or would not, see the distinctions the world wished to make between weak and strong, between women and men, laborer and lord.

sinewy adj. -tough, stringy, strong

If you believe that quote and could know the amount of sheer physical labor that went into transforming this space, I am definitely due to get some kind of illness. But maybe the 27 aphthous ulcers that have terrorized the inside of my mouth ARE my illness. Do you ever do that, work so hard for so long that you make yourself sick? Yeah, me too. And I regret to inform you that I've searched high and low for a before picture and can't find one. It was a guest room with dirty carpet and far to many fake plants. Trust me, this is better.

So, the first thing I undertook was to rip up the old--nasty--ten year old---stained with all manner of dog and human stuff---carpet. It was not a job for the faint of heart. Not to mention the overstuffed sofa and queen bed and other sundry furnishings that had to be removed from the room before that could even take place. I then painted the walls with 2 cans of leftover light colored paint that I mixed together.

When I ran out of paint with one large wall left, I decided to do a chalk wall.
Because who doesn't love a chalk wall and a little improvisational creativity?

With the carpet slowly being removed (by me, the little girls and my neighbor Leigh Ann) I commenced to painting the subflooring with porch paint. This was my biggest expense, totaling around $62. That process took around 5 days because the paint had to dry thoroughly in between coats. I used Meredith (whom to all our misfortune has quit blogging) for inspiration and 'how-to' information, but my sub-flooring was not nearly as nice as hers, so I did 3 coats of porch paint and it's looks very 'porch'-like---much more rustic than hers---but perfect for a craft studio. And then for kicks, I brought up every color of paint in my basement (which looks like the paint section at Lowe's minus the 20 year old paint section worker whose never painted a surface in his life) and began painting everything that didn't move.

Including this old school table that I bought last year at an antique store close-out for $50. I used stainless steel paint---which I will never use again---and though I liked the way it turned out okay, I hate using oil based paint, which this was. I could have achieved the same result with a silver paint and without all the hassle of mineral spirits.

Then, there were these wooden shelves---with the perfect little scalloped edges--- that were in my schoolroom that the girls and I painted. We used the cute scarf as our inspiration and picked from the multidinous colors at our disposal. Those shelves now are home to our yummy yarn collection. We also continued the color-love by adding jars of skittles and bubble gum----because who wants to spend all day in a craft studio where there's no sugar? Not me.

Then, we shopped the house for everything fun and colorful and 'crafty' we could find. If it didn't fit our fun and crafty criteria, we painted it!

The icing on the cake was this awesome 1950's glider which we found this weekend at a yard sale for $20. It gives the spectators of the crafting a place to sit and watch old episodes of Andy Griffith. Something about Aunt Bee just makes me wanna bake and sew.

And last but not least is this cool chair that we bought at a thrift store for $5 and recovered with pink toile. I've written a cautionary tale about my upholstering skills here.

The sewing table is constructed from an old 1980's computer desk (which I painted blue) and an old door from Goodwill which I decoupaged with the black polka-dot wrapping paper. We are always on the hunt for unique items to add to our vintage, colorful studio, but for now, we are enjoying our little woman cave, where we can escape from a whole host of activities including laundry, scrubbing toilets, and watching the fifth college football game on any given Saturday---don't get me wrong, I love the first four.

This room is a little santuary of sorts----where we girls can learn from each other----and where our 'violent enthusiasms' and 'driving energy' have a productive place to land.


The Nitty Gritty:

It cost roughly $150 and ten days to complete this makeover. For the wall paint, I mixed two Valspar colors in about a 50/50 ratio. They are foxtrot and hemingway. For the porch paint, I used Sherwin Williams porch paint---but tinted to the color Dover. I stayed up way too late a few nights and dealt with a plethora of aphthous ulcers and one nasty cold sore. But I'm a team player so I gladly take one for the home team to get this dreamy little cozy space in which to make memories with my girls. I used a variety of craft room photos for inspiration which you can find at my tumblr site. I thank Soulemama who never ceases to amaze me with her love for the creative life and how to teach that to our children. I am also indebted to the Nester for teaching us all that it doesn't have to be perfect to be beautiful.

Please visit Kimba's sight (it's DIY day) to see lots of fun DIY projects!

Weekend Treasures

Sunday, September 20, 2009

The chair we found on our 'thrifting' excursion: $5
Our find of the year---a 1950's glider: $20
A can of paint, 2 yards of cheap fabric and child labor: $25 (and a homeade milkshake)
Having a perfect place to sew and knit and hearing your 7yo say, "When I grow up, I'm gonna be ONE crafty momma!" : priceless

Notes:
1. You're gonna ask me how I recovered that chair and I'm gonna tell you that there was weeping, gnashing of teeth, hammerin', staplin', and then I put an afghan over the side that I completely messed up. In other words, you should get your recoverin' tutorial from someone who measures twice and cuts once----instead of from someone who just cuts! Thanks to Katilin for her help!
2. Just got that glider into the 'studio'---thanks to Marcus and Macdaddy. I promise to show you soon---although I'm afraid the suspense is gonna be more exciting than the actual reveal.


Hope your weekend was full of treasures too!

Visit 'Metamorphosis Monday' to see other fun transformations!
I'm also joining Rhoda for her 'yardsale treasures' carnival. Visit her blog here.

~~DIY French Painting Technique~~

Friday, July 24, 2009


What you'll need:

1. An inspiration photo

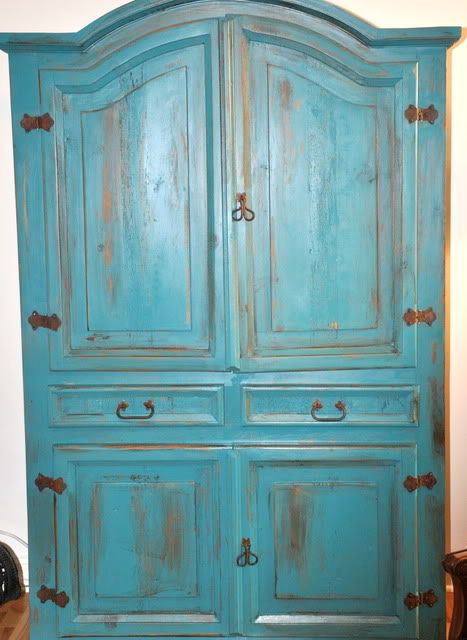
2. Deep Turquoise paint from the Laura Ashley collection at Lowe's. I used Latex semi-gloss and did not prime or sand. More on that later.
3. A candle---any candle---even a candle from last year's Advent wreath.
4. Sponge roller to paint with---so that you won't have those pesky brush marks---unless you like those, which I sometimes do.
5. Dark brown latex paint if you choose to add a little more distressing to the piece. I did apply the brown paint with a brush.
6. Wet wipes (or damp old rag) used for wiping the paint off the edges and corners.


First, decide if your piece needs sanded. My armoire was 15 years old, dry as a bone virgin wood and was begging for paint. To sand it would have been downright cruel. But if your piece needs it, sand it. I also did not prime it because I wanted to brown wood to show through underneath.

Then take your trusty candle and rub the edges, corners, and wherever on the piece you want the actual wood to show through. You should rub the candle vigorously enough that little flecks of candle wax are hanging onto the furniture. Then take a dry cloth and remove any flecks that are visible. This will allow you to easily wipe off the paint from the corners and edges. I first saw this technique on Censational Girl's blog, so you might want to check out this post, it's probably slightly more detailed than mine.

I just turned the candle on it's side and rubbed the corners. This is my banister---which is in danger of being stained or painted in the next few months.

Now, you're ready to paint. Use a sponge roller to avoid brush marks and begin painting.
I did small sections at a time---like the one armoire door at a time--because the paint dried so quickly on my parched little armoire. Just as the paint is drying (it took about 10 minutes on this piece), take wet wipes or a damp rag and wipe the paint off the edges where you had previously rub the candle wax. You can wipe the paint off as liberally as you'd like. The more paint you wipe off, the more distressed it looks.
If you mess up and take off too much paint, just paint it again, wait for it to almost dry (usually within 10 minutes) and then wipe again. Continue on until you achieve the look you love.

The next day, I decided that I wanted it to show a little more 'brown' so I took dark brown latex paint and painted the edges with the brown paint and then wiped some of that off until it looked like this. Overall, I bet this project took 3 hours. I adore it. I can't believe I went 15 years without painting it. And although I am completely smitten with this peacock blue, I have to say that when I saw Nester's beautiful blue armoire, I was a little torn. I want two blue armoires now. Her post on painting her armoire is much more comprehensive than mine, so check it out too. You'll learn something clever.

Other facts you should know:
1. I didn't paint the inside doors. I'm a little bit lazy when it comes to details.
2. I left the hardware on while I painted. I'm a little bit lazy when it comes to details.
3. I painted it right where it sits and scooted some craft paper underneath---on one side. I'm a little bit lazy when it comes to details.
4. I did not paint the back yet----and may never---you can probably guess why.


Before/After
I hope this answers your questions. Now get busy painting my friends. I'm joining Kimba's DIY party, so visit here for more DIY inspiration.

Also, thank you so much for your sweetest little messages from my post Wednesday. I'm feeling better and am now 24 hours tear-free. Love and hugs to you all and hope you have a great weekend. I haven't forgotten that I have one more post to finish my series. I hope to get that done before I leave for vacation!